Finalfit, knitr and R Markdown for quick results

Thank you for the many requests to provide some extra info on how best to get `finalfit` results out of RStudio, and particularly into Microsoft Word.

Here is how.

Make sure you are on the most up-to-date version of `finalfit`.

devtools::install_github("ewenharrison/finalfit")

What follows is for demonstration purposes and is not meant to illustrate model building.

Does a tumour characteristic (differentiation) predict 5-year survival?

Demographics table

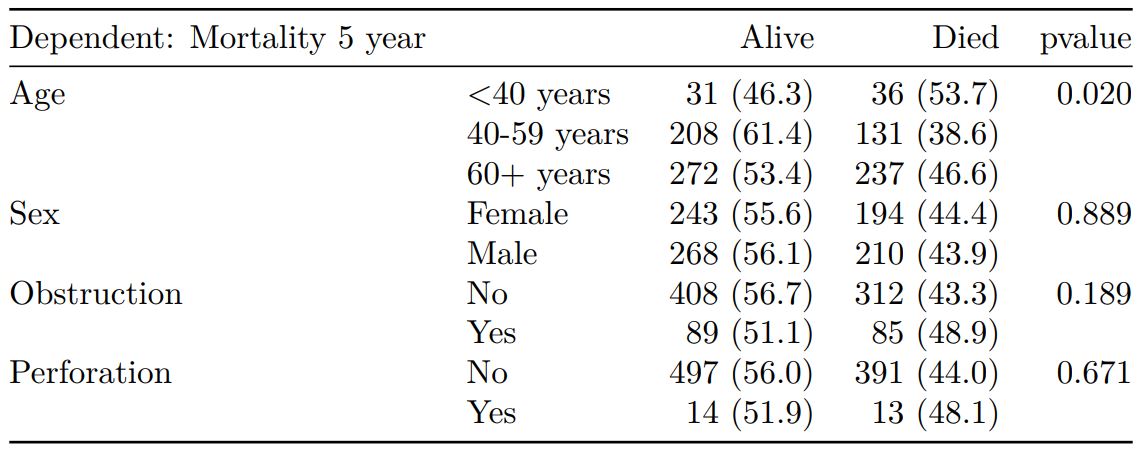
First explore variable of interest (exposure) by making it the dependent.

library(finalfit)
library(dplyr)

dependent = "differ.factor"

# Specify explanatory variables of interest
explanatory = c("age", "sex.factor", 
  "extent.factor", "obstruct.factor", 
  "nodes")

Note this useful alternative way of specifying explanatory variable lists:

colon_s %>% 
  select(age, sex.factor, 
  extent.factor, obstruct.factor, nodes) %>% 
  names() -> explanatory

Look at associations between our exposure and other explanatory variables. Include missing data.

colon_s %>% 
  summary_factorlist(dependent, explanatory, 
  p=TRUE, na_include=TRUE)
 
              label              levels        Well    Moderate       Poor      p
       Age (years)           Mean (SD) 60.2 (12.8) 59.9 (11.7)  59 (12.8)  0.788
               Sex              Female   51 (11.6)  314 (71.7)  73 (16.7)  0.400
                                  Male    42 (9.0)  349 (74.6)  77 (16.5)       
  Extent of spread           Submucosa    5 (25.0)   12 (60.0)   3 (15.0)  0.081
                                Muscle   12 (11.8)   78 (76.5)  12 (11.8)       
                                Serosa   76 (10.2)  542 (72.8) 127 (17.0)       
                   Adjacent structures     0 (0.0)   31 (79.5)   8 (20.5)       
       Obstruction                  No    69 (9.7)  531 (74.4) 114 (16.0)  0.110
                                   Yes   19 (11.0)  122 (70.9)  31 (18.0)       
                               Missing    5 (25.0)   10 (50.0)   5 (25.0)       
             nodes           Mean (SD)   2.7 (2.2)   3.6 (3.4)  4.7 (4.4) <0.001
Warning messages:
1: In chisq.test(tab, correct = FALSE) :
  Chi-squared approximation may be incorrect
2: In chisq.test(tab, correct = FALSE) :
  Chi-squared approximation may be incorrect
 

Note missing data in `obstruct.factor`. We will drop this variable for now (again, this is for demonstration only). Also see that `nodes` has not been labelled.
There are small numbers in some variables generating chisq.test warnings (predicted less than 5 in any cell). Generate final table.

Hmisc::label(colon_s$nodes) = "Lymph nodes involved"
explanatory = c("age", "sex.factor", 
  "extent.factor", "nodes")

colon_s %>% 
  summary_factorlist(dependent, explanatory, 
  p=TRUE, na_include=TRUE, 
  add_dependent_label=TRUE) -> table1
table1
 
 
 Dependent: Differentiation                            Well    Moderate       Poor      p
                Age (years)           Mean (SD) 60.2 (12.8) 59.9 (11.7)  59 (12.8)  0.788
                        Sex              Female   51 (11.6)  314 (71.7)  73 (16.7)  0.400
                                           Male    42 (9.0)  349 (74.6)  77 (16.5)       
           Extent of spread           Submucosa    5 (25.0)   12 (60.0)   3 (15.0)  0.081
                                         Muscle   12 (11.8)   78 (76.5)  12 (11.8)       
                                         Serosa   76 (10.2)  542 (72.8) 127 (17.0)       
                            Adjacent structures     0 (0.0)   31 (79.5)   8 (20.5)       
       Lymph nodes involved           Mean (SD)   2.7 (2.2)   3.6 (3.4)  4.7 (4.4) <0.001
 

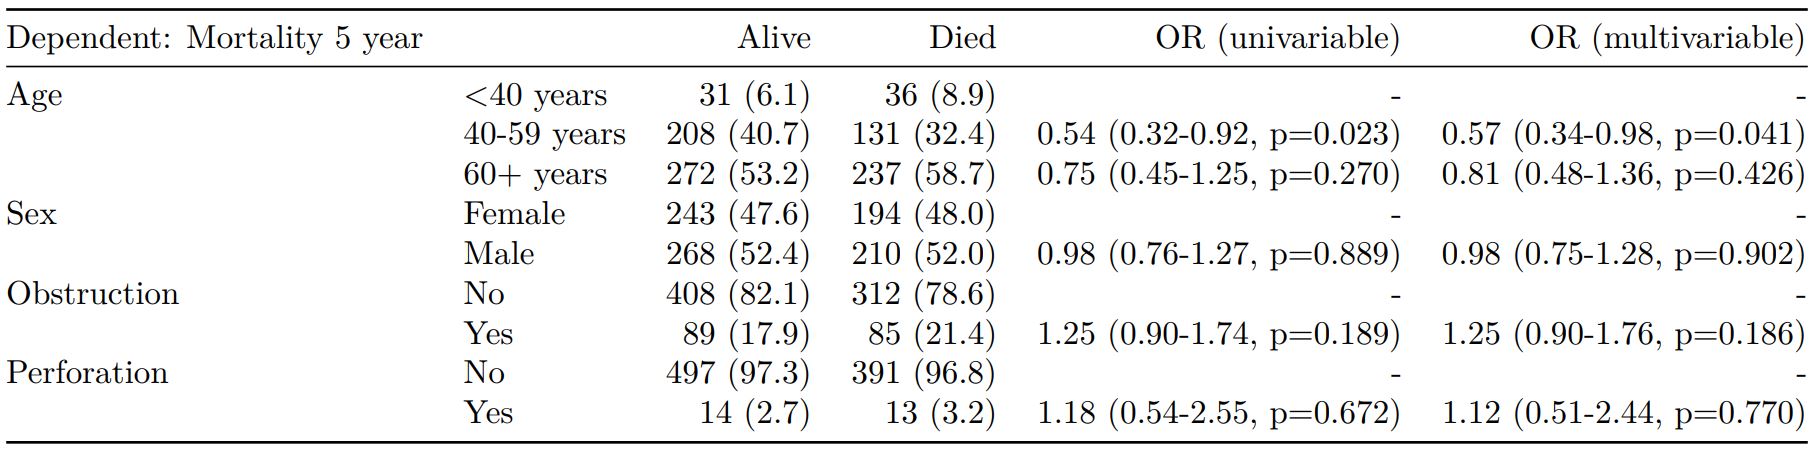
Logistic regression table

Now examine explanatory variables against outcome. Check plot runs ok.

 
explanatory = c("age", "sex.factor", 
  "extent.factor", "nodes", 
  "differ.factor")
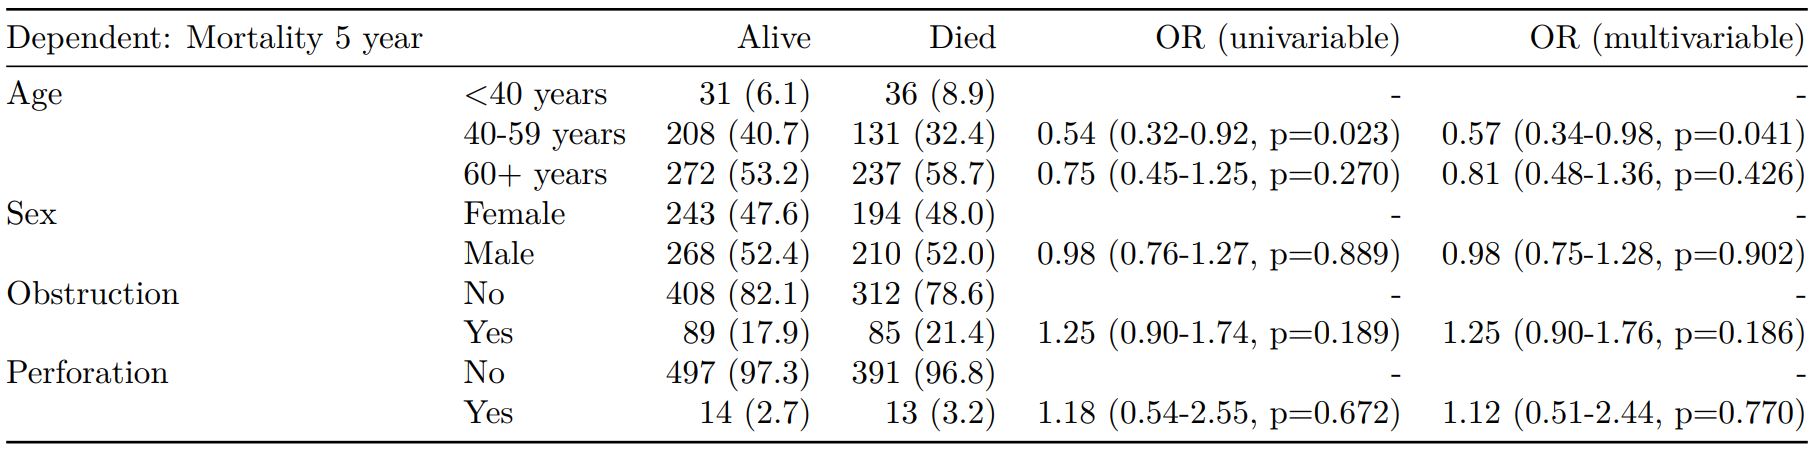
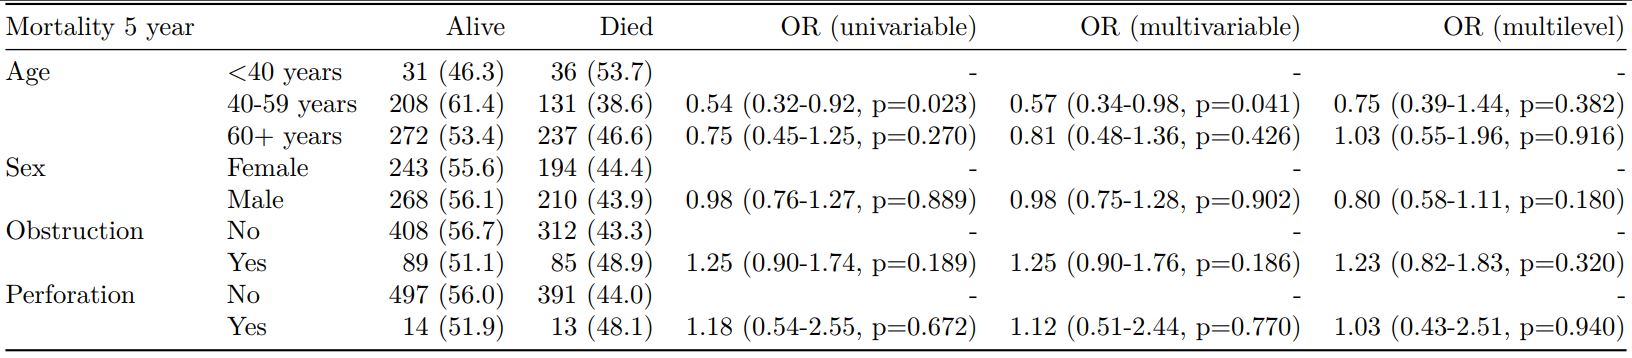
dependent = "mort_5yr"
colon_s %>% 
  finalfit(dependent, explanatory, 
  dependent_label_prefix = "") -> table2
 
 
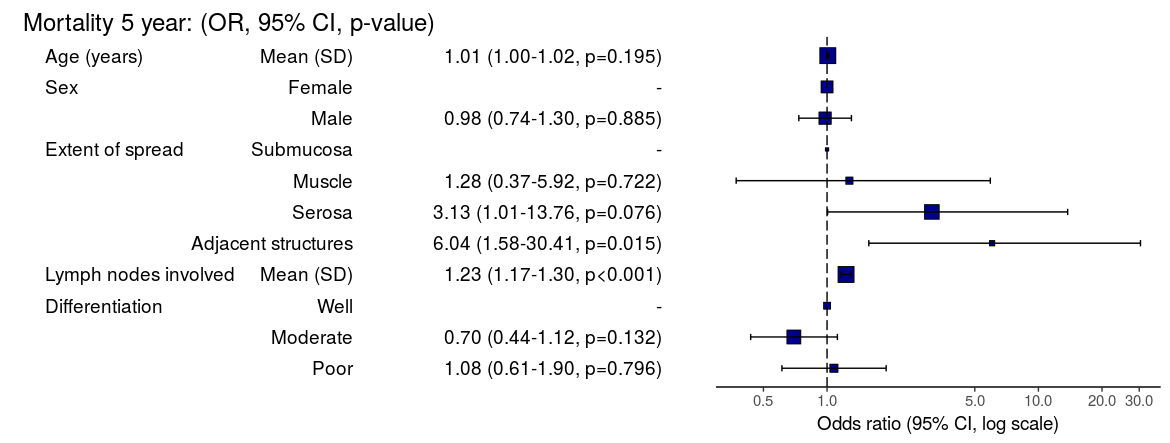
     Mortality 5 year                           Alive        Died           OR (univariable)         OR (multivariable)
          Age (years)           Mean (SD) 59.8 (11.4) 59.9 (12.5)  1.00 (0.99-1.01, p=0.986)  1.01 (1.00-1.02, p=0.195)
                  Sex              Female  243 (47.6)  194 (48.0)                          -                          -
                                     Male  268 (52.4)  210 (52.0)  0.98 (0.76-1.27, p=0.889)  0.98 (0.74-1.30, p=0.885)
     Extent of spread           Submucosa    16 (3.1)     4 (1.0)                          -                          -
                                   Muscle   78 (15.3)    25 (6.2)  1.28 (0.42-4.79, p=0.681)  1.28 (0.37-5.92, p=0.722)
                                   Serosa  401 (78.5)  349 (86.4) 3.48 (1.26-12.24, p=0.027) 3.13 (1.01-13.76, p=0.076)
                      Adjacent structures    16 (3.1)    26 (6.4) 6.50 (1.98-25.93, p=0.004) 6.04 (1.58-30.41, p=0.015)
 Lymph nodes involved           Mean (SD)   2.7 (2.4)   4.9 (4.4)  1.24 (1.18-1.30, p<0.001)  1.23 (1.17-1.30, p<0.001)
      Differentiation                Well   52 (10.5)   40 (10.1)                          -                          -
                                 Moderate  382 (76.9)  269 (68.1)  0.92 (0.59-1.43, p=0.694)  0.70 (0.44-1.12, p=0.132)
                                     Poor   63 (12.7)   86 (21.8)  1.77 (1.05-3.01, p=0.032)  1.08 (0.61-1.90, p=0.796)
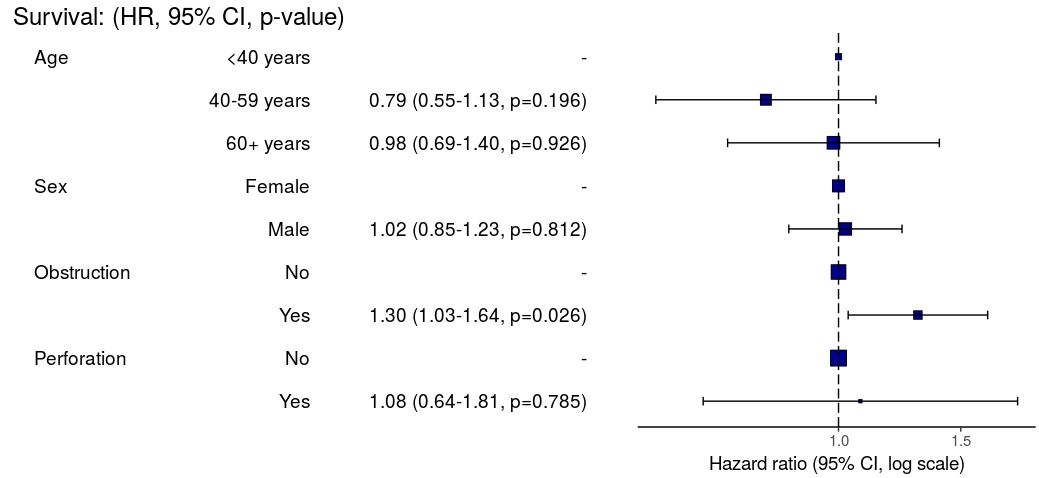
 

Odds ratio plot

colon_s %>% 
  or_plot(dependent, explanatory, 
  breaks = c(0.5, 1, 5, 10, 20, 30))

To MS Word via knitr/R Markdown

Important. In most R Markdown set-ups, environment objects require to be saved and loaded to R Markdown document.

# Save objects for knitr/markdown
save(table1, table2, dependent, explanatory, file = "out.rda")

We use RStudio Server Pro set-up on Ubuntu. But these instructions should work fine for most/all RStudio/Markdown default set-ups.

In RStudio, select `File > New File > R Markdown`.

A useful template file is produced by default. Try hitting `knit to Word` on the `knitr` button at the top of the `.Rmd` script window.

Now paste this into the file:

---
title: "Example knitr/R Markdown document"
author: "Ewen Harrison"
date: "22/5/2018"
output:
  word_document: default
---

```{r setup, include=FALSE}
# Load data into global environment. 
library(finalfit)
library(dplyr)
library(knitr)
load("out.rda")
```

## Table 1 - Demographics
```{r table1, echo = FALSE, results='asis'}
kable(table1, row.names=FALSE, align=c("l", "l", "r", "r", "r", "r"))
```

## Table 2 - Association between tumour factors and 5 year mortality
```{r table2, echo = FALSE, results='asis'}
kable(table2, row.names=FALSE, align=c("l", "l", "r", "r", "r", "r"))
```

## Figure 1 - Association between tumour factors and 5 year mortality
```{r figure1, echo = FALSE}
colon_s %>% 
  or_plot(dependent, explanatory)
```

It's ok, but not great.

Create Word template file

Now, edit the Word template. Click on a table. The `style` should be `compact`. Right click > `Modify... > font size = 9`. Alter heading and text styles in the same way as desired. Save this as `template.docx`. Upload to your project folder. Add this reference to the `.Rmd` YAML heading, as below. Make sure you get the space correct.

The plot also doesn't look quite right and it prints with warning messages. Experiment with `fig.width` to get it looking right.

Now paste this into your `.Rmd` file and run:

---
title: "Example knitr/R Markdown document"
author: "Ewen Harrison"
date: "21/5/2018"
output:
  word_document:
    reference_docx: template.docx  
---

```{r setup, include=FALSE}
# Load data into global environment. 
library(finalfit)
library(dplyr)
library(knitr)
load("out.rda")
```

## Table 1 - Demographics
```{r table1, echo = FALSE, results='asis'}
kable(table1, row.names=FALSE, align=c("l", "l", "r", "r", "r", "r"))
```

## Table 2 - Association between tumour factors and 5 year mortality
```{r table2, echo = FALSE, results='asis'}
kable(table2, row.names=FALSE, align=c("l", "l", "r", "r", "r", "r"))
```

## Figure 1 - Association between tumour factors and 5 year mortality
```{r figure1, echo = FALSE, warning=FALSE, message=FALSE, fig.width=10}
colon_s %>% 
  or_plot(dependent, explanatory)
```

This is now looking good for me, and further tweaks can be made.

To PDF via knitr/R Markdown

Default settings for PDF:

---
title: "Example knitr/R Markdown document"
author: "Ewen Harrison"
date: "21/5/2018"
output:
  pdf_document: default
---

```{r setup, include=FALSE}
# Load data into global environment. 
library(finalfit)
library(dplyr)
library(knitr)
load("out.rda")
```

## Table 1 - Demographics
```{r table1, echo = FALSE, results='asis'}
kable(table1, row.names=FALSE, align=c("l", "l", "r", "r", "r", "r"))
```

## Table 2 - Association between tumour factors and 5 year mortality
```{r table2, echo = FALSE, results='asis'}
kable(table2, row.names=FALSE, align=c("l", "l", "r", "r", "r", "r"))
```

## Figure 1 - Association between tumour factors and 5 year mortality
```{r figure1, echo = FALSE}
colon_s %>% 
  or_plot(dependent, explanatory)
```

Again, ok but not great.
[gview file="http://www.datasurg.net/wp-content/uploads/2018/05/example.pdf"]

We can fix the plot in exactly the same way. But the table is off the side of the page. For this we use the `kableExtra` package. Install this in the normal manner. You may also want to alter the margins of your page using `geometry` in the preamble.

---
title: "Example knitr/R Markdown document"
author: "Ewen Harrison"
date: "21/5/2018"
output:
  pdf_document: default
geometry: margin=0.75in
---

```{r setup, include=FALSE}
# Load data into global environment. 
library(finalfit)
library(dplyr)
library(knitr)
library(kableExtra)
load("out.rda")
```

## Table 1 - Demographics
```{r table1, echo = FALSE, results='asis'}
kable(table1, row.names=FALSE, align=c("l", "l", "r", "r", "r", "r"),
						booktabs=TRUE)
```

## Table 2 - Association between tumour factors and 5 year mortality
```{r table2, echo = FALSE, results='asis'}
kable(table2, row.names=FALSE, align=c("l", "l", "r", "r", "r", "r"),
			booktabs=TRUE) %>% 
	kable_styling(font_size=8)
```

## Figure 1 - Association between tumour factors and 5 year mortality
```{r figure1, echo = FALSE, warning=FALSE, message=FALSE, fig.width=10}
colon_s %>% 
  or_plot(dependent, explanatory)
```

This is now looking pretty good for me as well.
[gview file="http://www.datasurg.net/wp-content/uploads/2018/05/example2.pdf"]

There you have it. A pretty quick workflow to get final results into Word and a PDF.

Elegant regression results tables and plots in R: the finalfit package

The finafit package brings together the day-to-day functions we use to generate final results tables and plots when modelling. I spent many years repeatedly manually copying results from R analyses and built these functions to automate our standard healthcare data workflow. It is particularly useful when undertaking a large study involving multiple different regression analyses. When combined with RMarkdown, the reporting becomes entirely automated. Its design follows Hadley Wickham’s tidy tool manifesto.

Installation and Documentation

The full documentation is now here: finalfit.org

The code lives on GitHub.

You can install finalfit from CRAN with:

install.packages("finalfit")

It is recommended that this package is used together with dplyr, which is a dependent.

Some of the functions require rstan and boot. These have been left as Suggests rather than Depends to avoid unnecessary installation. If needed, they can be installed in the normal way:

install.packages("rstan")
install.packages("boot")

To install off-line (or in a Safe Haven), download the zip file and use devtools::install_local().

Main Features

1. Summarise variables/factors by a categorical variable

summary_factorlist() is a wrapper used to aggregate any number of explanatory variables by a single variable of interest. This is often “Table 1” of a published study. When categorical, the variable of interest can have a maximum of five levels. It uses Hmisc::summary.formula().

library(finalfit)
library(dplyr)

# Load example dataset, modified version of survival::colon
data(colon_s)

# Table 1 - Patient demographics by variable of interest ----
explanatory = c("age", "age.factor", 
  "sex.factor", "obstruct.factor")
dependent = "perfor.factor" # Bowel perforation
colon_s %>%
  summary_factorlist(dependent, explanatory,
  p=TRUE, add_dependent_label=TRUE)

See other options relating to inclusion of missing data, mean vs. median for continuous variables, column vs. row proportions, include a total column etc.

summary_factorlist() is also commonly used to summarise any number of variables by an outcome variable (say dead yes/no).

# Table 2 - 5 yr mortality ----
explanatory = c("age.factor", 
  "sex.factor",
  "obstruct.factor")
dependent = 'mort_5yr'
colon_s %>%
  summary_factorlist(dependent, explanatory, 
  p=TRUE, add_dependent_label=TRUE)

Tables can be knitted to PDF, Word or html documents. We do this in RStudio from a .Rmd document. Example chunk:

```{r, echo = FALSE, results='asis'}
knitr::kable(example_table, row.names=FALSE, 
    align=c("l", "l", "r", "r", "r", "r"))
```

2. Summarise regression model results in final table format

The second main feature is the ability to create final tables for linear (lm()), logistic (glm()), hierarchical logistic (lme4::glmer()) and
Cox proportional hazards (survival::coxph()) regression models.

The finalfit() “all-in-one” function takes a single dependent variable with a vector of explanatory variable names (continuous or categorical variables) to produce a final table for publication including summary statistics, univariable and multivariable regression analyses. The first columns are those produced by summary_factorist(). The appropriate regression model is chosen on the basis of the dependent variable type and other arguments passed.

Logistic regression: glm()

Of the form: glm(depdendent ~ explanatory, family="binomial")

explanatory = c("age.factor", "sex.factor", 
  "obstruct.factor", "perfor.factor")
dependent = 'mort_5yr'
colon_s %>%
  finalfit(dependent, explanatory)

Logistic regression with reduced model: glm()

Where a multivariable model contains a subset of the variables included specified in the full univariable set, this can be specified.

explanatory = c("age.factor", "sex.factor", 
  "obstruct.factor", "perfor.factor")
explanatory_multi = c("age.factor", 
  "obstruct.factor")
dependent = 'mort_5yr'
colon_s %>%
  finalfit(dependent, explanatory, 
  explanatory_multi)

Mixed effects logistic regression: lme4::glmer()

Of the form: lme4::glmer(dependent ~ explanatory + (1 | random_effect), family="binomial")

Hierarchical/mixed effects/multilevel logistic regression models can be specified using the argument random_effect. At the moment it is just set up for random intercepts (i.e. (1 | random_effect), but in the future I’ll adjust this to accommodate random gradients if needed (i.e. (variable1 | variable2).

explanatory = c("age.factor", "sex.factor", 
  "obstruct.factor", "perfor.factor")
explanatory_multi = c("age.factor", "obstruct.factor")
random_effect = "hospital"
dependent = 'mort_5yr'
colon_s %>%
  finalfit(dependent, explanatory, 
  explanatory_multi, random_effect)

Cox proportional hazards: survival::coxph()

Of the form: survival::coxph(dependent ~ explanatory)

explanatory = c("age.factor", "sex.factor", 
"obstruct.factor", "perfor.factor")
dependent = "Surv(time, status)"
colon_s %>%
  finalfit(dependent, explanatory)

Add common model metrics to output

metrics=TRUE provides common model metrics. The output is a list of two dataframes. Note chunk specification for output below.

explanatory = c("age.factor", "sex.factor", 
  "obstruct.factor", "perfor.factor")
dependent = 'mort_5yr'
colon_s %>%
  finalfit(dependent, explanatory, 
  metrics=TRUE)
```{r, echo=FALSE, results="asis"}
knitr::kable(table7[[1]], row.names=FALSE, align=c("l", "l", "r", "r", "r"))
knitr::kable(table7[[2]], row.names=FALSE)
```

Rather than going all-in-one, any number of subset models can be manually added on to a summary_factorlist() table using finalfit_merge(). This is particularly useful when models take a long-time to run or are complicated.

Note the requirement for fit_id=TRUE in summary_factorlist(). fit2df extracts, condenses, and add metrics to supported models.

explanatory = c("age.factor", "sex.factor", 
  "obstruct.factor", "perfor.factor")
explanatory_multi = c("age.factor", "obstruct.factor")
random_effect = "hospital"
dependent = 'mort_5yr'

# Separate tables
colon_s %>%
  summary_factorlist(dependent, 
  explanatory, fit_id=TRUE) -> example.summary

colon_s %>%
  glmuni(dependent, explanatory) %>%
  fit2df(estimate_suffix=" (univariable)") -> example.univariable

colon_s %>%
  glmmulti(dependent, explanatory) %>%
  fit2df(estimate_suffix=" (multivariable)") -> example.multivariable

colon_s %>%
  glmmixed(dependent, explanatory, random_effect) %>%
  fit2df(estimate_suffix=" (multilevel)") -> example.multilevel

# Pipe together
example.summary %>%
  finalfit_merge(example.univariable) %>%
  finalfit_merge(example.multivariable) %>%
  finalfit_merge(example.multilevel) %>%
  select(-c(fit_id, index)) %>% # remove unnecessary columns
  dependent_label(colon_s, dependent, prefix="") # place dependent variable label

Bayesian logistic regression: with `stan`

Our own particular rstan models are supported and will be documented in the future. Broadly, if you are running (hierarchical) logistic regression models in Stan with coefficients specified as a vector labelled beta, then fit2df() will work directly on the stanfit object in a similar manner to if it was a glm or glmerMod object.

3. Summarise regression model results in plot

Models can be summarized with odds ratio/hazard ratio plots using or_plot, hr_plot and surv_plot.

OR plot

# OR plot
explanatory = c("age.factor", "sex.factor", 
  "obstruct.factor", "perfor.factor")
dependent = 'mort_5yr'
colon_s %>%
  or_plot(dependent, explanatory)
# Previously fitted models (`glmmulti()` or 
# `glmmixed()`) can be provided directly to `glmfit`

HR plot

# HR plot
explanatory = c("age.factor", "sex.factor", 
  "obstruct.factor", "perfor.factor")
dependent = "Surv(time, status)"
colon_s %>%
  hr_plot(dependent, explanatory, dependent_label = "Survival")
# Previously fitted models (`coxphmulti`) can be provided directly using `coxfit`

Kaplan-Meier survival plots

KM plots can be produced using the library(survminer)

# KM plot
explanatory = c("perfor.factor")
dependent = "Surv(time, status)"
colon_s %>%
  surv_plot(dependent, explanatory, 
  xlab="Time (days)", pval=TRUE, legend="none")

Notes

Use Hmisc::label() to assign labels to variables for tables and plots.

label(colon_s$age.factor) = "Age (years)"

Export dataframe tables directly or to R Markdown knitr::kable().

Note wrapper summary_missing() is also useful. Wraps mice::md.pattern.

colon_s %>%
  summary_missing(dependent, explanatory)

Development will be on-going, but any input appreciated.

Install github package on safe haven server

I’ve had few enquires about how to install the summarizer package on a server without internet access, such as the NHS Safe Havens.

  1. Uploadsummarizer-master.zip from here to server.
  2. Unzip.
  3. Run this:

“`
library(devtools)
source = devtools:::source_pkg(“summarizer-master”)
install(source)

“`

Edit

As per comments, devtools::install_local() has previously failed, but may now also work directly.